Elopement & Intimate Wedding photographer serving Indiana, Maine, colorado, utah, & Beyond


Getting the Perfect Ring Shot {Education for Photographers}

How often do you get home from a wedding or an engagement session and the ring shots are dark, out of focus, or simply just don’t do the ring justice? This was me, after every session and every wedding. I loved loved loved photographing rings, but I was always disappointed with my ring shots afterwards. If this is something you struggle with, you’re in luck! Today I’m sharing my favorite tips on getting the perfect ring shot every time!
1. SHOOT WITH A MACRO LENS
I love my 90mm Tamron 2.8 Macro lens and I use it for every single one of my ring shots! It took me a couple years before I finally gave in bought it! I thought I could get the same job done with my 35mm or 50mm, and while those lenses can work for some ring shots that are taken farther back, they don’t compare at all to a true macro lens! You can get so much closer, show much more detail in the diamond, and have better accuracy when it comes to focusing! If you’re a wedding photographer, a macro lens is a must!
Check out my list of lenses that are a must have for wedding photographers, especially if you’re on a budget!
2. SHOOTING IN THE RIGHT LIGHT
Of course, with anything photography related, lighting is the most important aspect! And it’s no different for ring shots! When I walk into the bridal suit in the morning, the first thing I do is pick my ideal location for detail shots, which usually consists of directional window light. First, be sure to take the time to turn off any lights in the room! Window light can tend to have a cool temperature to it, and if you keep the lights on, you’ll be mixing the cool light with a warmer light from the light bulbs. This can seriously mess with your white balance and have an impact on how “clean” your detail shots look!
Next, I place my detail set up at a 45 degree angle facing towards the window. Then I add a white board to the side opposite the window (where the shadow hits the subject)! I’ve found that front lighting my ring shots really brings out the sparkle and helps get rid of nasty glare that could create muddy colors in the diamond! But it’s important to note that I never completely front light my ring shots! If I did, I’d be blocking the window light from hitting the ring! By setting up at a 45 degree angle, you’ll still get beautiful, clean images! And by adding the white board to the shadow side, you’ll be adding light to the darker portion of the image!

3. FOCUS MANUALLY & HOLD YOUR BREATH
This is the only part of the wedding day that I will suggest you switch from auto focus to manual focus. Because the rings (and any jewelry) are so small, and the focus needs to be SO precise, you will achieve better, and more accurate results with manual focus! If you practice, but you’re still not getting the results you want, try holding your breath while taking each shot! As living organisms, we tend to move just a small amount forward and back, or side to side, when we breathe. And those few millimeters of movement can have a serious affect on your focus! Again, because you have to be SO precise when shooting jewelry, holding your breath will help eliminate that extra movement!
4. FOCUS ON THE PRONG CLOSEST TO YOU, NOT THE DIAMOND
If you focus on the diamond itself, the prongs will be out of focus because of one single rule of thumb regarding depth of field: wherever your focal point, 2/3 behind it will be in focus, and 1/3 in front of it will be in focus.
So, when you focus on the object closest to you (the prong), the majority of the focal range (2/3rds to be exact) is behind the focal point. Which means, the diamond will still look in focus even though it isn’t your actual focal point. If you focus on the diamond, the 1/3 in front rule is not enough to keep the prongs in focus, making the entire shot look back focused! And now you see why manual focus and holding your breath is so important! Now you aren’t focusing on a huge diamond, but instead a tiny little prong!
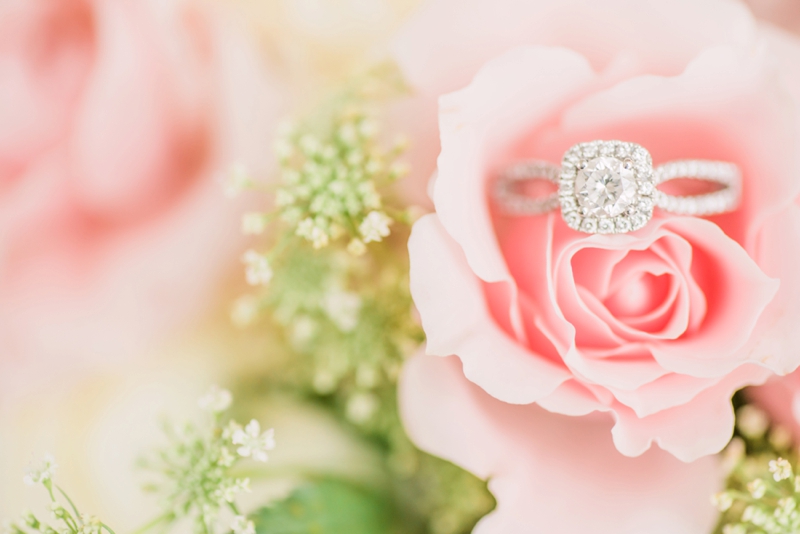
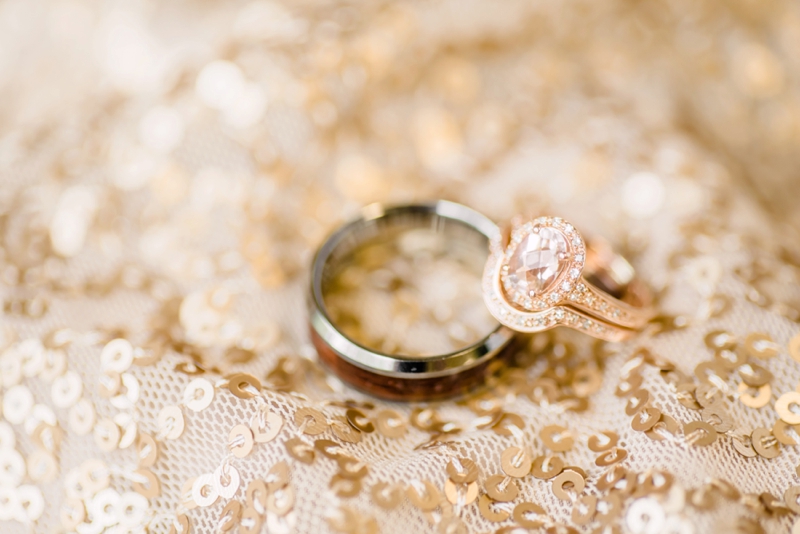
5. TRY MULTIPLE ARRANGEMENTS
Now that you have the basics down, it’s time to play! There are TONS of different arrangements you can do with ring shots, espeically if you’re working with the engagement ring and both wedding bands! I always start with shooting all 3 rings together, and once I have enough variation, I take the two wedding bands out of the arrangement and focus on just the engagement ring! Below is a list of the arrangements that I use most often, and above are sample images with each corresponding arrangement! When trying out the different arrangements, don’t forget to shoot each arrangement from different angles to add more variety to the gallery!
A. The Balancing Act
This arrangement is hands down, my absolute favorite! It is such a show stopper, but it can definitely take some time as well as steady hands and a steady surface! It works best when both rings are the same in diameter! But because male fingers are usually wider than females, it can be tough to find the right fit! If you love this arrangement, bring along some tacky putty to help hold the rings together! #lifehack
B. The Stack
This one is so simple and definitely a classic! Start with the groom’s ring as the base, and then rest the brides rings on top! The angle of the engagement ring is super important for this shot! When placing the rings, be sure that the diamond part of her ring is resting upright on the grooms wedding band! This can be a little tricky to get the rings to stay in place, so just take your time! Slow and steady wins the race!
C. The Lineup
This arrangement is by far the easiest! Just lay each ring flat and line the others up next to each other! You can have them lined up in a horizontal line, a vertical line, clustered together in a triangle, or my favorite… a curved line (because you don’t have to worry about it being perfectly straight)!
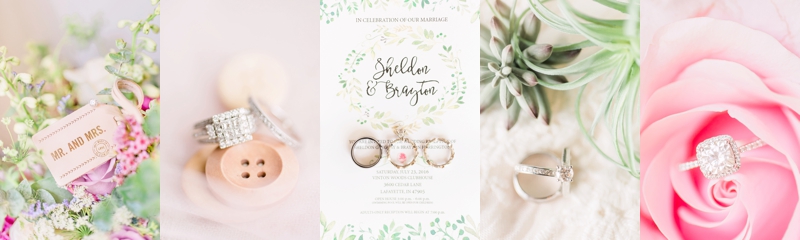
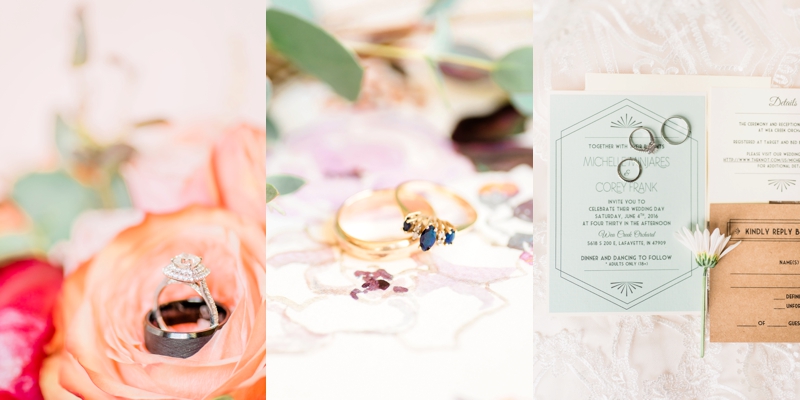
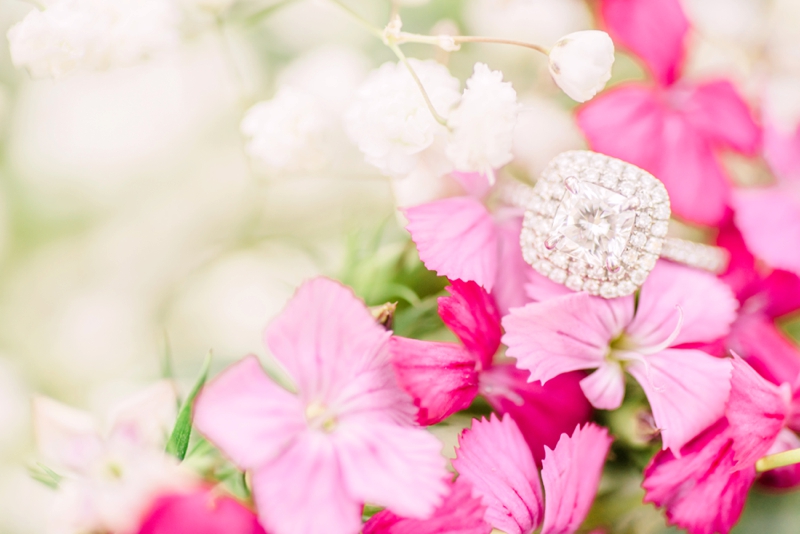
6. USE STYLING ELEMENTS
THIS is where the real fun beings. Brides often have a theme to their wedding, and with that theme comes beautiful styling elements! Why shoot the rings on a white board when you can place the rings in bridal bouquet! There are SO many elements you could incorporate into the ring shots to really make those images stand out and flow with the theme of your brides wedding!
The ring in the first image of the sequence sets on top of Emma’s luggage tag for their honeymoon. Kara’s ring in the second image sets on top of a few buttons she used in her reception decor. And when in doubt, you can always use the invitation to place the rings on! Two birds, one stone! There are ton’s of options with each wedding! Just think outside of the box, remember the basics, and the rest will fall into place!
Thank you so much for reading! I hope these tips and tricks will help you get the perfect ring shot at your next wedding! Just remember, practice makes progress! Grab a fake ring, pick some flowers from your garden, make a little set up next to a window in your living room and get to practicing! Your brides will love you for it!


